Vuforia New License Do I Need to Reupload All Targets Again
Augmented Reality is a way to connect virtual objects with the real earth, making it possible to naturally interact with them by use of mobile devices like phones, tablets or new mixed reality devices like HoloLens.
Vuforia is one of the most popular Augmented Reality platforms for developers, and Microsoft partnered with Vuforia to bring their application to the Universal Windows Platform (UWP).
Today, we will bear witness you how to create a new Unity projection and develop a real AR experience from scratch for devices running Windows 10.
Yous can download the source for this awarding here, but I encourage you to follow the steps and build this yourself.
As nosotros've noted, augmented reality is the creation of a connexion betwixt the real globe around you lot and a virtual globe. One of the ways to make this connection is to use real objects like cards or magazines, and and then connect them with virtual objects rendered on a digital interface.
What are we going to develop?
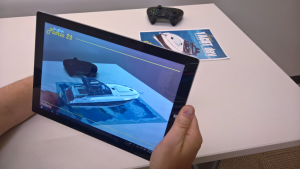
This article consists of two parts. In Part i, we will become you up and running with Vuforia, an augmented reality SDK. This includes creating an account, configuring information technology and getting the SDK. In Part two, we will develop an app that detects the front cover of a boating magazine, then render the boat on the front cover in 3D. Y'all can and so look effectually the boat and see information technology from all different angles.
Function i: Getting started with Vuforia half dozen
The get-go thing we need is an account at https://programmer.vuforia.com/.
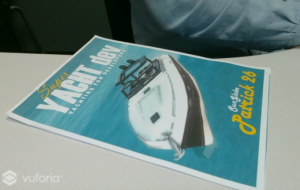
This is needed so nosotros can become the free license central equally well as a place to upload our markers. A marking tin can exist any paradigm, and is used by Vuforia to connect a real world object with our virtual world. In this article, we will use one marker – an epitome of the font embrace of a magazine.
You tin can download this front encompass here:

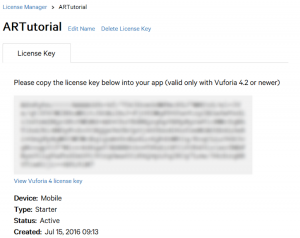
i) Creating a license
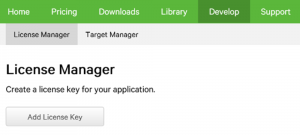
After logging in click Develop, so Add License Key:
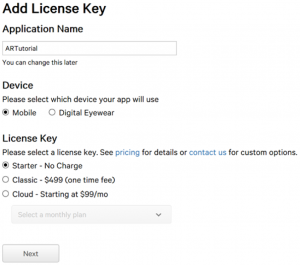
This volition take you to a form where y'all can gear up the details of this license. They tin be changed and removed later on.
Fill it out like this, using your ain application name:
two) Creating our markers
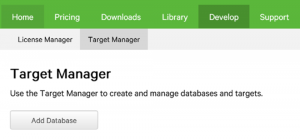
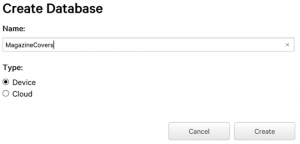
Now that we have a license, we can go alee and create our markers. All of the markers can be added to a unmarried database. However in the Develop tab, click Target Managing director and Add Database:
Fill out the course that pops up. It is needed to create a database for our markers. This database will be downloaded and added to your app locally – on the device itself – so select Device as the database blazon:
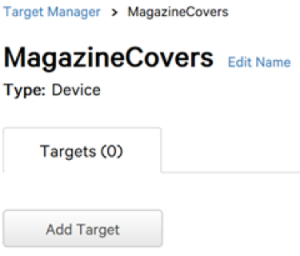
Once created, click the MagazineCovers entry in the database list to open up it:

Now we are ready to add the targets. In the MagazineCover database view, Click Add Target:
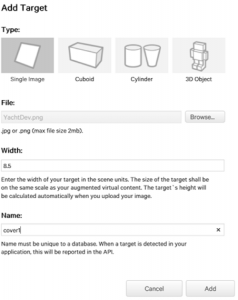
A new grade will show, where you lot will need to select the image you lot want to use, its width and a proper name. Select the magazine front end cover I provided earlier, set the width to viii.5 and name it cover1. Click Add to upload it and generate a mark:
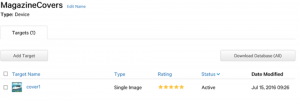
Once uploaded, you will encounter information technology in the database view:
Done! Next, we will create a new Unity project and add the Vuforia SDK to it.
3) Creating a new Unity Project
If y'all don't have Unity yet, you tin go ahead and download information technology hither: http://unity3d.com/. A free personal license is available.
Start Unity, and from the project creation magician, ensure 3D is selected and name the project "MagAR":
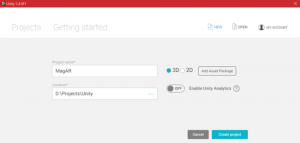
So click Create projection.
4) Downloading the Vuforia SDK
When the projection is created, we demand to import the Vuforia SDK for Unity packet. It can exist downloaded from here (accept the latest version): https://developer.vuforia.com/downloads/sdk

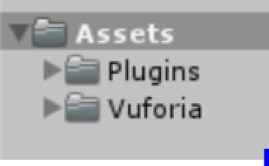
Once downloaded, you can simply double-click the packaged file to import it to your solution:
Once extracted, a popup like this will show. Click Import to add the Vuforia SDK to your project. Your solution should await something like this:
five) Adding our Mark Database to our projection
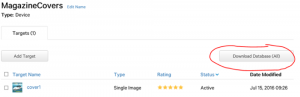
At present that nosotros have the Vuforia SDK installed, the terminal thing we need to do is to add the marker database we created earlier to our project.
Go back to the Vuforia Developer portal, and click the Download Database (All) button from your MagazineCover database:
Select the Editor as the development platform and click Download:

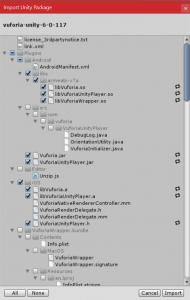
Once compiled and downloaded, you can just open the Unity package file to import it to your project:
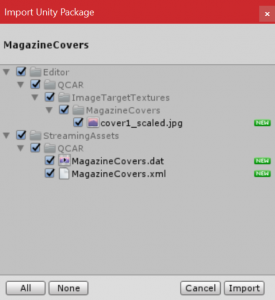
Yous tin can see from the import dialogue that nosotros got the embrace marker, as well as the database itself. Click Import and you are all ready to starting time developing!
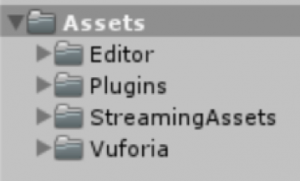
Your solution should look something similar this:
Part 2: Developing the app!
Now that we have the Vuforia SDK installed as well as the markers we need, the fun tin begin.
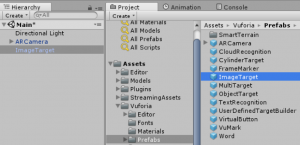
Vuforia comes with a set of drag and driblet assets. Yous can take a expect at them in the Vuforia/Prefrabs folder every bit seen below:
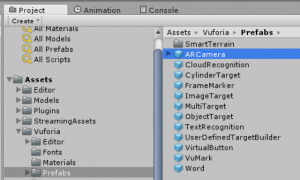
Vuforia uses a special camera called ARCamera, highlighted above, to enable tracking of markers. Every Vuforia project will demand this. This special camera has a lot of settings and configuration possibilities (which nosotros'll take a look at shortly), and will exist able to detect real world objects using, in this example, the front comprehend of a magazine. Vuforia volition and then place a virtual ballast on the encompass so we tin can become its virtual position and orientation for apply in our virtual earth.
Another thing we will need is the target itself. This is the prefab named ImageTarget, and information technology is too configurable. Let'due south go ahead with the evolution.
one) Calculation the ARCamera to our scene and configuring it
a) Add photographic camera
From the Vuforia/Prefabs binder, drag and drop the ARCamera prefab into your scene to add information technology. You lot can delete the GameObject chosen Principal Camera from the scene since nosotros want to use the ARCamera equally our view into the scene instead:
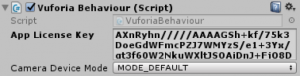
Next, click the ARCamera prefab to see its backdrop in the Inspector. This component is the center of your application and requires some simple setup. The first thing it needs is your app's License Fundamental.
b) Getting license central
Go to the Vuforia Developer Portal, select your license and copy the entire Vuforia License primal from that gray box in the middle of the screen:
c) Setting license key
Next, in the ARCamera inspector, paste the license key to the App License Primal box:
d) Setting how many images to track
Another setting we want to verify is the Max Simultaneous Tracked Images setting – we want to accept one comprehend magazine on the table at a given time, and then brand certain this is set to 1. This tin be inverse based on your needs:
![]()
e) Setting world orientation
Next nosotros want to make sure that nosotros orient the world around our camera, so ready the World Center Mode to CAMERA to achieve this:
![]()
f) Loading our database
We besides want to load and actuate the Magazine Covers database, then tick the Load Magazine Covers, and actuate it.

m) Testing the ARCamera
At this betoken, we should be able to test our ARCamera – it won't have whatever virtual actions but, if set up properly, we should exist able to see the output from the spider web camera.
To test, click the play push on top of the scene view. You should be able to meet what the photographic camera sees and the Vuforia watermark:
2) Adding our first basic marker
Markers are added to your scene using the ImageTarget prefab. These can then be configured to your liking, equally well as selecting what marker it will use for detection. In Unity, each item added to your scene is a GameObject – think of this as your base class. Each GameObjects in your scene tin can take multiple children and siblings.
The way an ImageTarget works is that it can have child GameObjects and, once the magazine cover is detected, these child GameObjects will become visible. If the carte isn't detected, the children will be hidden.
a) Adding an ImageTarget
Calculation an ImageTarget is as simple equally adding an ARCamera, just elevate and drib the prefab to the scene bureaucracy view:
b) Configuring the ImageTarget
We at present demand to configure which marker the ImageTarget will use. Select the ImageTarget and view its properties. Find the Database and Image Target properties.
Showtime, set the Database to MagazineCovers, then set the Image Target to cover1:
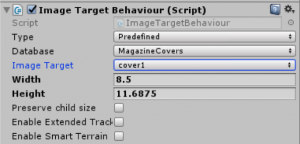
You tin come across that it automatically populated some of the fields.
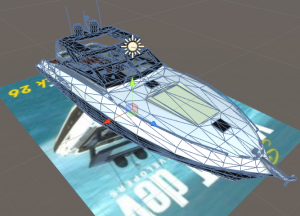
c) Spawning a gunkhole on top of the marker!
Now – allow's spawn a boat on summit of the mark! I purchased a nice gunkhole from the Unity Asset Shop. In that location are other boats available that may be free: https://world wide web.assetstore.unity3d.com/en/#!/content/23181
Navigate to the folder for your asset, then elevate it (or its prefab) onto the ImageTarget so it becomes a kid of the ImageTarget.

Then, position/scale the boat and so information technology fits on top of the ImageTarget (the magazine cover).
Looking at the scene view, you tin now see the magazine embrace with the gunkhole on tiptop of it:
d) Testing if information technology spawns
Let's get ahead and run the app once more. Place the magazine on the playfield (in front end of the camera) and the yacht will get visible on top and will track if y'all motility the marking.
e) Adding details
You can add together even more things to the scene, like h2o, and tin can modify the lighting and then your scene becomes more realistic. Feel free to play effectually with information technology.
3) Exporting equally a UWP
Getting your experience running on a Windows x device will make the experience fifty-fifty better, since your tablet has the ability to easily move.
To export the solution from Unity, go to File -> Build Settings:
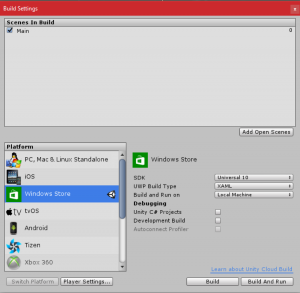
From this dialogue, set the Platform to Windows Shop and the SDK to Universal x and click Build. A new dialogue will enquire you to select a folder to consign to; you tin can create a new one or select an existing one – it'southward upwards to yous. Once the export is washed, a new UWP Solution is created in the selected binder.
Go ahead and open up this new solution in Visual Studio 2015.
iv) Testing the app
Once Visual Studio 2015 has loaded the solution, gear up the Build Configuration to Principal and the Platform to x86, and build and run it on your local machine:
![]()
Verify that the application is running and working equally information technology should.
5) Adding a simple UI using XAML
Allow's also add together a simple user interface to the app using XAML. To practice this, open up the MainPage.xaml file from the project tree and view the code. It should simply consist of a SwapChainPanel with a Filigree in it, similar so:
[code lang="xml"]
<SwapChainPanel x:Name="DXSwapChainPanel">
<Grid 10:Name="ExtendedSplashGrid" Background="#FFFFFF">
<Epitome 10:Name="ExtendedSplashImage" Source="Avails/SplashScreen.png" VerticalAlignment="Center" HorizontalAlignment="Eye"/>
</Filigree>
</SwapChainPanel>
[/code]
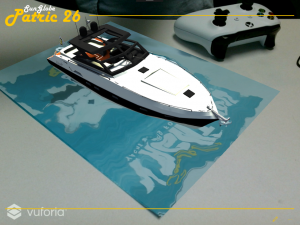
Yous might also desire to decorate the screen with a logo and some lines to make the UI look neat and clean. To do this, we need a file from the downloadable source (/Assets folder) called SunglobePatrick26x2001.png. Add this to your solutions Assets binder.
Next, alter your XAML lawmaking to be similar to this:
[code lang="xml"]
Side by side, alter your XAML code to exist like to this:
<SwapChainPanel x:Name="DXSwapChainPanel">
<Grid ten:Name="ExtendedSplashGrid" Background="#FFFFFF">
<Image ten:Name="ExtendedSplashImage" Source="Assets/SplashScreen.png"
VerticalAlignment="Center" HorizontalAlignment="Center"/>
</Grid>
<Rectangle Fill up="#FFF3C000" HorizontalAlignment="Stretch" Height="3"
Stroke="#FFF3C000" VerticalAlignment="Top" Margin="360, 64, 24, 0"/>
<Image VerticalAlignment="Top" HorizontalAlignment="Left" Margin="24, -80, 0, 0"
Width="300" Source="Assets/SunglobePatrick26x2001.png"></Image>
<Rectangle Fill="#FFF3C000" HorizontalAlignment="Stretch" Height="iii"
Stroke="#FFF3C000" VerticalAlignment="Lesser" Margin="24, 0, 24, 64"/>
<CommandBar VerticalAlignment="Lesser" IsOpen="Truthful" Background="#00000000"
Foreground="#FFF3C000" Margin="0,0,18,0">
<AppBarButton Icon="Edit" Foreground="#FFF3C000" />
</CommandBar>
</SwapChainPanel>
[/lawmaking]
What we're doing hither is using the XAML tags to add ii rectangles, used as lines, for a minimalistic UI, likewise every bit calculation the logo for the boat.
Run the app again to see the UI on top of your rendering canvas:
That's it! Yous now know how to develop AR applications for Windows x devices!
Wrapping up
To sum up, we created an AR experience for Windows 10 with the following simple steps:
1) Create an account at the Vuforia Developer Portal
two) Acquire a license
iii) Created a Unity projection using the Vuforia SDK
4) Exporting the Unity projection as a UWP app for Windows 10
5) Added a simple UI using XAML
Download Visual Studio to get started.
The Windows team would love to hear your feedback. Please keep the feedback coming using our Windows Developer UserVoice site . If you have a direct bug, please utilize the Windows Feedback tool congenital directly into Windows x.
Source: https://blogs.windows.com/windowsdeveloper/2016/10/12/how-to-develop-augmented-reality-apps-with-vuforia-for-windows-10/